Changing SonicWall Remote Authentication Mechanisms
SonicWall remote access appliances allow you to authenticate your users a number of different mechanisms. Because most of our clients are running Active Directory, we stick with AD/LDAP when possible. I ran into an issue today that caught me a bit off guard but I was able to work around it. It’s the kind of thing that might not ever help anyone but if it does, I imagine they will be very glad this is here.
Skip to the end if you don’t want the story.
I was migrating the configuration of an older SonicWall SSL-VPN to a new SRA. The models don’t really matter but what does is that the old one was very old, the new one was brand new. I was happy to find that I export the settings from the old and import to the new without any fuss, despite jumping many firmware versions. In the process, I noticed that the ZIP spat out by the SonicWall contained a few unencrypted (by default — that can be changed) .conf files. I was happy to see that my configuration was all there and tucked that knowledge away for later.
With the new device online, I checked all the settings and everything was good. This is a company of about 40 people and they all use the appliance heavily. In particular, they rely on each user having a profile setup in the device with a custom RDP shortcut to their desktop. The import was crucial because reconfiguring each user would be extremely time-consuming and have potential for stupid mistakes to be made. The profiles were intact, all was right with the world.
Until I arrived at the area where we configure authentication for the domain… But first, let’s step back and put this in context.
In addition to bringing in a new SRA that was adequate for them, we were replacing their over-burdened, terribly-configured server. Engineering decisions had been made that were normal maybe ten years ago but very out of place in an even-kind-of-modern domain: insane VBS scripts instead of GPOs, DHCP scope far too huge, WINS configured, folder redirection handled manually on client machines instead of GPOs, home folders set directly in the users in AD… that kind of stuff. It had been a minefield but we persevered.
Snap forward to today. The page said that their old IT company configured them to use RADIUS authentication. The IP address was pointed at their old server. Why they’d use RADIUS when they could use the native LDAP auth was beyond me but there it was… and the server it was pointing at would no longer respond… and the SonicWall does not allow you to change the authentication mode. To make matters worse, I discovered that all of the user profiles were connected with the Domain as configured and deleting it (the domain) would remove all of the user profiles. It seemed all was lost.
But then I remembered the plain text conf files. I still had my backup file handy so I popped it open to see if it referenced the authentication method. Sure enough, there it was.
domain domain-name
auth-type radius
cert-verify false
delete-external-users false
user-passwords false
server 10.10.61.1
comments Welcome domain
use-otp false
secret dsdn87
radius-port 1812
radius-timeout 5
radius-retry 2
radius-backup-server
radius-backup-port 1812
radius-backup-secret
radius-filter-id true
radius-protocol PAP
portal-name domain-name
exit
!
My new SRA wasn’t in production and I hadn’t made any changes to it, so all I’d have to do is configure AD the way I wanted, export, compare the two, pop out the RADIUS-specific settings and insert AD. But there was another snag: SonicWall 7.0 firmware exports its config as JSON, a radically different configuration format. Oh no… again!
Or not. Exported the new config that had all my AD settings specified, imported the original again to bring RADIUS and my precious user profiles back, exported THAT to get a copy of it as JSON, and compared.
If you’re a network admin, you probably aren’t familiar with JSON unless you’ve done some web development. It stands for JavaScript Object Notation and it’s a lot like a friendlier XML that’s intended to be both readable and writable by humans.
tl;dr here’s how you do it
**Export your current firewall config, save it as “original-auth.zip”
Delete the offending authentication entry (in the “Domains” section of the firewall) and create a new one with the mechanism, address, and options that you want, then export this config and save it as “desired-auth.zip”
Export the full contents of each ZIP to a different folder and open settings.json.
Find the “Domains” section of each file. You will be making changes to the ORIGINAL file but you still have your ZIP, so at worst you can just restore that. There are two sections you need to change. First, find the “Domains” object and locate your target domain. It will have a domainId, domainName, and authType. Here’s part of my original:
“domainId”: 2,
“domainName”: “domain-name”,
“authType”: 2,
“certVerify”: false,
And here’s the same section from my desired-auth.
“domainId”: 2,
“domainName”: “domain-name”,
“authType”: 4,
“certVerify”: false,
“authType” does what you think it does. Make the original match your desired settings.
Scroll down more (or CTRL + F) and find the section that has the specifics for your auth type.
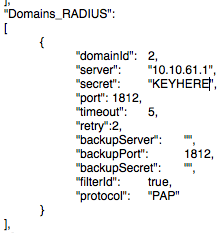
Original:
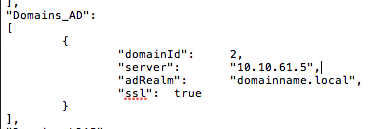
“Domains_RADIUS” is blank on the new one, but “Domains_AD” is not.
Copy and paste that whole section, from the leading { to the closing } and put it in between the square brackets. Make sure to remove the original authentication method.
(Switched to screenshots because WordPress was fucking up the formatting.)
Now save the new file, ZIP up everything into a new package, and upload. It should remove the offending authentication method and add the new one. The user accounts are based on the domain, not the authentication, so they will still be there and will work perfectly as long as all the names match.

